Modern Campus CMS How To's
- Editor Access: How to Access the CMS
- Gadgets: How to find checked-out pages or content
- Unpublish File (page) NEW
- Gadgets: How to find which pages are linking to my document/image/page
- Employee List: How to manage the employee list component
- Reminders: How to set content reminders
- Data: How to edit office hours and locations
CMS Content Editor Access
There are two parts to obtain editor permissions. To become a CMS content editor you must complete both parts and the Webpage Section Owner must approve the requester's access.
- Complete the course within VC EDGE: CMS Content Editor Basic User
- Click the above link and log into Atlas to be taken to the course page in VC EDGE.
- Click ‘Request to Enroll in the Course', then click “Launch” on your Transcript page to complete.
- Contact Organizational Development orgdevelopment@valenciacollege.edu to resolve any difficulties with the EDGE course.
- Complete a request within OIT's ticketing system: Webpage Content Editing Access
- Click the above link and log in using your @valenciacollege.edu email and password to be taken to the access request page.
- Complete the prompts, then click "Request Item"
The website "section" Liaison must approve the requester's access.
Web Services will contact the section liaison to obtain approval to grant access to the requester.
Once approval is received, OIT will set-up the user's account.
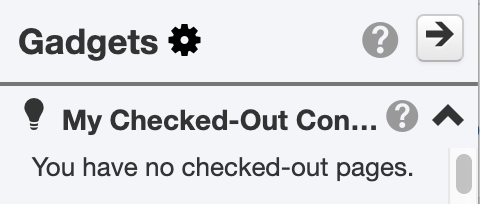
Gadgets
How to find checked-out pages or content
- Log into CMS
- Locate “gear” icon at top right corner
- Expand “My Checked-Out Content”
- Click each page
- Publish page or click yellow light bulb to “check in” the page
Outside of the gadget, another way to find checked-out pages or content is on the dashboard.
- Log into CMS
- Click on the dashboard button at the top left of the page
Gadget - My Checked Out Content

Gadget - You have no checked out pages.

Gadgets
How to find which pages are linking to my document/image/page
- Use the Page Info and Dependency Tag Info Gadget to identify which pages your documents, images or pages are linked from. The easiest way to do this is to use both the "Page Info" and "Dependency Tag Info" gadgets together.
- First, browse to the file location and open your document, image or page. Then open the gadgets by clicking on the button with a plug icon at the top right of your screen. Then open the Page Info gadget and click on the Page Product code e.g. {{xxxxxxxx}}. This will automatically open the Dependency Tag Info gadget and will show you the information you're looking for. You may need to scroll down within the gadget.
- Once you have the Dependency Tag Info gadget open, scroll down to the "Subscribers" section. This will either say "none" or show you the link to the pages that are currently linked to your document/image/page. If it says none, that means there are no links to the file you're viewing. This can be moved to the recycle bin safely without causing any broken links. If it shows you links, then you can open those pages and update the links to the new file you might be replacing (this is required if you are changing the file name).
- Why is this useful? This is useful if you are considering removing the document/image/page from the web server. This will allow you to remove or update the links and prevent broken links/images.

Gadgets
Unpublish File (page) NEW
- Use the Unpublish File Gadget to "hide" your page from public view
- The purpose is to have the ability to edit your page while it's offline
- This is different from recycling your page because that will remove the page from the staging server and stay in the recycle bin for 30 days. You can restore your page within 30 days.
- The page will remain offline until you are ready to publish the page to the live web server again
Employee List Component
- To add the employee list component, add a heading for the list first.
- Create a new line below the heading and click on the component button (looks like a solar system icon)
- Choose "Staff - List Table"
- Enter user names separated by commas
- Click save
To edit the list, click on the blue button and then the pencil icon.
To delete it, click on the X icon.

Reminders
You can set Scheduled or Stale Content reminders for any page that you have the rights to edit. Reminders can send a message to yourself or your group to remind you to review the file for any needed updates. Once set, reminders can be edited in the same way. To clear a reminder from a page, open the "Reminders" box and then deselect the checkbox for that reminder.
How to Access Reminders
- In Content > Pages, hover over the file and select Edit > Reminders.
- While viewing a page, click Properties in the top toolbar and select "Reminders" from the left-hand menu.
Tip
It can be helpful to set reminders to update content that has information that changes each semester or year.
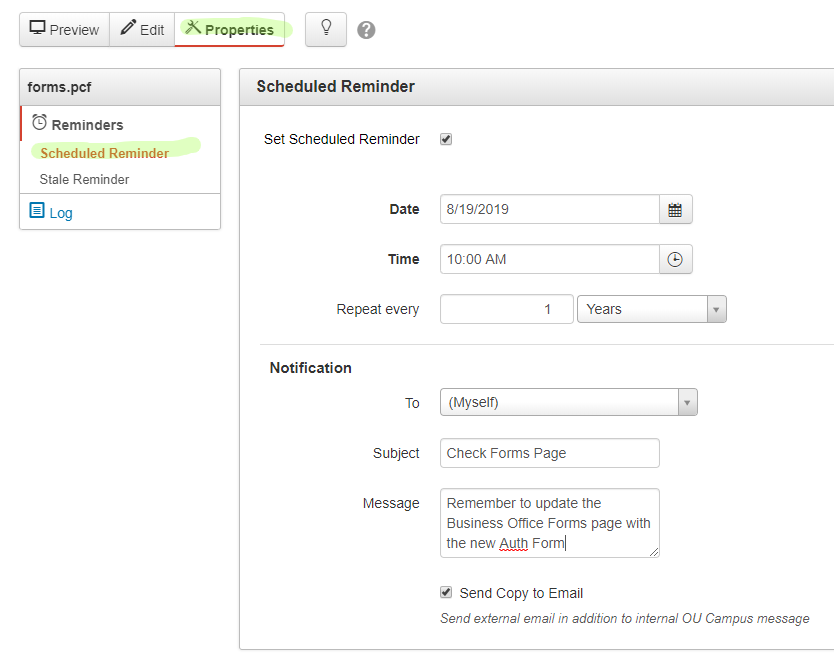
Scheduled Reminder
This is used to send a notification at a specific date and time. Helpful for when you need to remind yourself to update specific information. You can also set this reminder to repeat periodically.
- Check "Set Scheduled Reminder"
- Set a date & time for the reminder to be sent.
- Optional: If you would like this reminder to repeat, set the "Repeat Every" x days/weeks/months/years
- Choose who should get the notification
- Choose (Myself) if you would like to be the only recipient.
- Choose a group if you would like everyone in that group to receive the email. Groups are titled based on the folder. So, if you want to send a notification to everyone who can edit content in the "Business Office," choose folder-business-office.
- Optional: You can add a message to the email. It is helpful to use a message to remind yourself what needs to be done.
- Recommended: Check "Send Copy to Email" to get the reminder in your Valencia College email. If this isn't checked, the message will only show in your Modern Campus CMS Inbox.
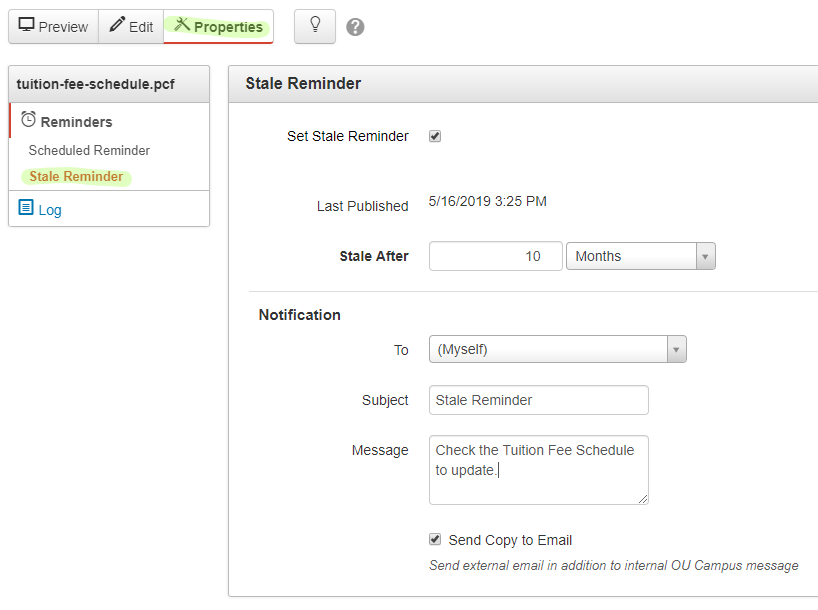
Stale Reminder
This is used to make sure content on a page is being updated periodically. If the page hasn't been published after the time set, a notification is triggered.
- Check "Set Stale Reminder"
- Choose an interval to check in days/weeks/months/years
- Choose who should get the notification
- Choose (Myself) if you would like to be the only recipient.
- Choose a group if you would like everyone in that group to receive the email. Groups are titled based on the folder. So, if you want to send a notification to everyone who can edit content in the Business office, choose folder-business-office.
- Optional: You can add a message to the email. It is helpful to use a message to remind yourself what needs to be done.
- Recommended: Check "Send Copy to Email" to get the reminder in your Valencia Email. If this isn't checked, the message will only show in your Modern Campus CMS Inbox.
Office Hours and Location Data
Information for Location and Hours is added to a page using a dynamic data “widget.” The data is not editable on the page. Data for hours and locations is managed in the "Department and Office Directory" database. You can request an edit to this data using the "Update Department Information" channel in Atlas.
Edits can take up to 48-hours to be approved and published.
Follow these instructions to submit a change of location or hours for your department or office.
- Log into Atlas
- Browse to the tab titled "Employees"
- Locate the channel titled "Employee Support"
- Click "Update Department Information"
- Select your office from the drop down field
For assistance, submit a request to Web Services.

