Modern Campus CMS Uploading Files
Jump To:
Standards for Uploading Files
Uploading files may seem like something simple and it actually is once you get used to the process. However, there are steps required before uploading the file that are necessary to keep things organized. This helps us manage uploaded files when there are a lot of files that accumulate over time. The first thing to think about before uploading a file is the size of the file. It's a good idea to reduce the size of a file on the web to speed up the download time. Next, the file name is important because there are other tools that use the file name to make it easier for people to find the files when searching. After you have reduced the file size and named your file properly, it's ready to upload!
Below you will find the details about naming your file, where to upload and most importantly how to upload. Once your file is uploaded, there are instructions on how to link to the file.
Good luck and happy uploading!
File sizes
- File sizes should be kept to a minimum to allow users to download them quickly.
- Images in a file can increase the file size a lot. If you have images in your file, it's best to reduce the file size of the image before placing it into your file.
- If you have already reduced the image sizes and the file is still large, Adobe Acrobat has a tool to reduce the PDF file size that may help.
- It's best not to embed videos in files. Please ask us for help with videos.
File names
- File names must contain only:
- Lowercase letters
- Numbers
- Dashes "-"
- Name your document something that will be helpful to the user.
- myfile-update-01192564-(1)-final-web.pdf
- valencia-college-program-application.pdf
- Remove outdated files so they don't show up in searches (Move to Recycle Bin).
- Unless your file is a part of a series, it is preferable to have a standard file name,
instead of naming a file using a year. Use a "last updated" date in the body of the
file, instead. This way you can overwrite the file with the same file name instead
of having to remove an outdated file.
- program-guide-2019.pdf
- program-guide.pdf
To overwrite or replace an existing file, you must use the identical file name. Check "Overwrite Existing" on the upload dialog box to do this. This will cut down on broken links and help reduce "old" files.
See instructions and video belowFolders
- Each website section will have a documents folder.
- Please upload documents in the documents folder in the same section that you are editing.
- Allowed document formats:
- DOCX
- XLSX
- Duplicate documents: Make sure you aren't trying to upload a document that already exists on the website unless you are doing so intentionally to replace it.
- Remove outdated files.
If you would like to link to a document that has been uploaded in a folder that you do not control, change the environment to "production" in the upload dialog box. When you publish a file, it's uploaded to the "production" web server.
- Production is where published files are located.
- Staging is where files are prepared to be published.

PDF Files
PDF files are used mainly for sharing a file that needs to be standardized when printed or used offline.
- PDF or Web Page: To reduce the number of unnecessary PDF files, create a web page for content that is not intended to be printed or downloaded.
- Forms: PDF files may also be used for creating forms. Web Services recommends using PDF forms only for forms that need to be printed out and physically signed.
- PDF or PowerPoint: Please save PowerPoint files as a PDF file before uploading to distribute slides. Upload a PowerPoint file only if someone would need the original slide deck.
For help creating a new web page, form or to upload documents, please create a Service Desk Request.
Be aware that creating PDF documents may cause accessibility issues, especially if you are scanning a printed document. For help creating accessible PDF document, please contact:
Microsoft Office Documents
Word or Excel documents should be used if you are providing a template to users.
- Use a MS Office Document only if you would like someone to edit your file.
- Create a new web page or upload a PDF version of the MS Office Document if you do not want users to edit the file.
DOC and XLS documents are older formats that were created in Word 2007 or earlier. Open these files using Office 2013 or later and choose Save As:
- "Word Document (*.DOCX)" or "Excel Document (*.XLSX)".
Tutorial
Instructions for uploading a new document
- Prepare your document file name for uploading
Change the file name using the naming standard mentioned above. The standard is to use all lowercase letters and dashes to separate the words. - Upload the document
Scroll to the footer and click the copyright symbol to open the CMS editor. After you open the editor, click on the pages link at the top of the editor. Find the documents folder. Open the documents folder and click the upload button. Drag and drop your document here or click the green add button to use the file browser to select your document. - Publish the document
After the document has been uploaded, you must publish the document to move it from the staging area to the web server (production). You can hover over the document to find the publish button or select the checkbox next to the documents you want to publish and click the publish button at the top of the editor. Then click the green publish button. - Link to the document
Open the page where you want to add a link to your new document. Scroll down to the area where you want to add a link. Type new text for the link or highlight existing text. It's best for searching and accessibility purposes to type descriptive text about the document (avoid using "click here" or similar). After you select the text you want to link, click the link button at the top of the editor. Click the folder button to browse for the document you uploaded. TIP: You can use the filter to type the name of the document to find it faster if there are a lot of documents in the folder. Select the document you want to link to, set the target to New window and click OK. - Publish the page
After you have created the link to your document, click the save button at the top left of the editor. Then click the green publish button above the editor. It's best to write a short description of your changes to the page before publishing. Click the green publish button to complete the upload process. - Test your changes
Click the View in new window link and then click your document link to make sure it's working properly. If it doesn't work, go back and repeat the process. It's common to forget publishing the document after uploading.
Instructions for uploading and replacing an existing document
- Prepare your document file name for uploading
Change the name to match the current file already linked on the page. The name must be exact.
- Upload the document
Scroll to the footer and click the copyright symbol to open the CMS editor. After you open the editor, click on the pages link at the top of the editor. Find the documents folder. Open the documents folder and click the upload button. Drag and drop your document here or click the green add button to use the file browser and select your document. You will notice the text of the file name is red because there is already a file there with that name. Check "Overwrite Existing" checkbox in the upload dialog box to do remove the warning.
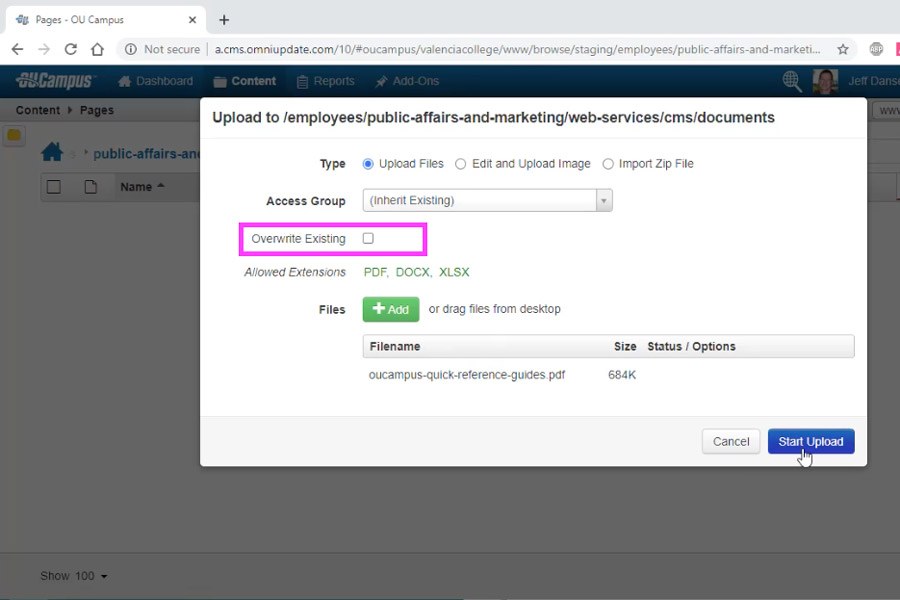 Overwrite an Existing Document
To replace an existing document of the identical name, be sure to check the “Overwrite Existing” checkbox.
The video tutorial at the bottom of this instructional page will show the steps in the document upload process.
- Publish the document
After the document has been uploaded, you must publish the document to move it from the staging area to the web server (production). You can hover over the document to find the publish button or select the checkbox next to the documents you want to publish and click the publish button at the top of the editor. Then click the green publish button. - Test the new document
Open the page where the document is linked and click your document link to make sure it's working properly. Since the file is a replacement with the exact same name, you may need to clear your browser's cache to see the new file. The old file might still be cached on your computer.
If you have Adobe Acrobat versions Standard, Pro DC or Pro (not Reader). It's possible to reduce the file size for web downloads.
Simply click on the Documents drop down and select "Reduce file size" and save with a new file name.
Tutorial Video
Questions?
For help with a specific page, use the Request Help Gadget in OU Campus.
For information on using the editing tools, refer to the Modern Campus CMS Quick Reference Guide.
Create a Service Desk Request